Showing posts tagged Android
[ For more information on the Eideticker software I’m referring to, see this entry ]
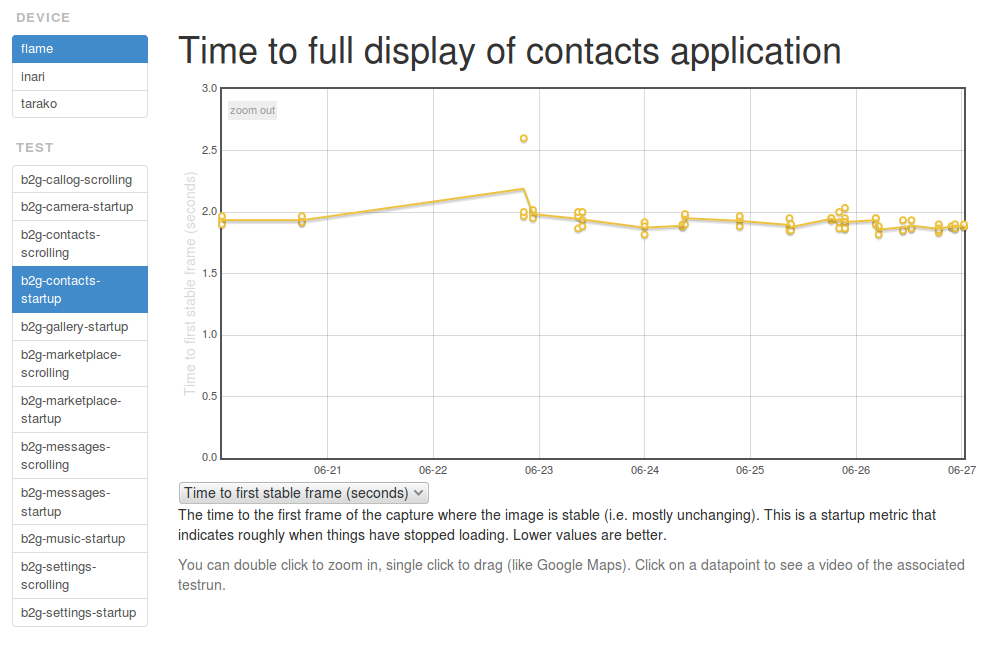
Just wanted to give an update on where Eideticker is at the end of Q2 2014. The big news is that we’ve started to run startup tests against the Flame, the results of which are starting to appear on the dashboard:
 [link]
It is expected that these tests will provide a useful complement to the existing startup tests we’re running with b2gperf, in particular answering the “is this regression real?” question.
Pending work for Q3:
- Enable scrolling tests on the Flame. I got these working against the Hamachi a few months ago but because of some weird input issue we’re seeing we can’t yet enable them on the Flame. This is being tracked in bug 1028824. If anyone has background on the behaviour of the touch screen driver for this device I would appreciate some help.
- Enable tests for multiple branches on the Flame (currently we’re only doing master). This is pretty much ready to go (bug 1017834), just need to land it.
- Annotate eideticker graphs with internal benchmark information. Eli Perelman of the FirefoxOS performance team has come up with a standard set of on-load events for the Gaia apps (app chrome loaded, app content loaded, …) that each app will generate, feeding into tools like b2gperf and test-perf. We want to show this information in Eideticker’s frame-by-frame analysis (example) so we can verify that the app’s behaviour is consistent with what it is claimed. This is being tracked in bug 1018334
- Re-enable Eideticker for Android and run tests more frequently. Sadly we haven’t been consistently generating new Eideticker results for Android for the last quarter because of networking issues in the new Mountain View office, where the test rig for those live. One way or another, we want to fix this next quarter and hopefully run tests more frequently against mozilla-inbound (instead of just nightly builds)
The above isn’t an exhaustive list: there’s much more that we have in mind for the future that’s not yet scheduled or defined well (e.g. get Eideticker reporting to Treeherder’s new performance module). If you have any questions or feedback on anything outlined above I’d love to hear it!
Today I did a quick port of Larry Doolittle’s ntpclient program to Android and FirefoxOS. Basically this lets you easily synchronize your device’s time to that of a central server. Yes, there’s lots and lots of Android “applications” which let you do this, but I wanted to be able to do this from the command line because that’s how I roll. If you’re interested, source and instructions are here:
https://github.com/wlach/ntpclient-android
For those curious, no, I didn’t just do this for fun. For next quarter, we want to write some Eideticker-based responsiveness tests for FirefoxOS and Android. For example, how long does it take from the time you tap on an icon in the homescreen on FirefoxOS to when the application is fully loaded? Or on Android, how long does it take to see a full list of sites in the awesomebar from the time you tap on the URL field and enter your search term?
Because an Eideticker test run involves two different machines (a host machine which controls the device and captures video of it in action, as well as the device itself), we need to use timestamps to really understand when and how events are being sent to the device. To do that reliably, we really need some easy way of synchronizing time between two machines (or at least accounting for the difference in their clocks, which amounts to about the same thing). NTP struck me as being the easiest, most standard way of doing this.
Last summer I wrote a bit about using Eideticker to measure the relative performance of Firefox for Android versus other browsers (Chrome, stock, etc.). At the time I was pretty optimistic about Eideticker’s usefulness as a truly “objective” measure of user experience that would give us a more accurate view of how we compared against the competition than traditional benchmarking suites (which more often than not, measure things that a user will never see normally when browsing the web). Since then, there’s been some things that I’ve discovered, as well as some developments in terms of the “state of the art” in mobile browsing that have caused me to reconsider that view — while I haven’t given up entirely on this concept (and I’m still very much convinced of eideticker’s utility as an internal benchmarking tool), there’s definitely some limitations in terms of what we can do that I’m not sure how to overcome.
Essentially, there are currently three different types of Eideticker performance tests:
- Animation tests: Measure the smoothness of an animation by comparing frames and seeing how many are different. Currently the only example of this is the canvas “clock” test, but many others are possible.
- Startup tests: Measure the amount of time it takes from when the application is launched to when the browser is fully running/available. There are currently two variants of this test in the dashboard, both measure the amount of time taken to fully render Firefox’s home screen (the only difference between the two is whether the browser profile is fully initialized). The dirty profile benchmark probably most closely resembles what a user would usually experience.
- Scrolling tests: Measure the amount of undrawn areas when the user is panning a website. Most of the current eideticker tests are of this kind. A good example of this is the taskjs benchmark.
In this blog post, I’m going to focus on startup and scrolling tests. Animation tests are interesting, but they are also generally the sorts of tests that are easiest to measure in synthetic ways (e.g. by putting a frame counter in your javascript code) and have thus far not been a huge focus for Eideticker development.
As it turns out, it’s unfortunately been rather difficult to create truly objective tests which measure the difference between browsers in these two categories. I’ll go over them in order.
Startup tests
There are essentially two types of startup tests: one where you measure the amount of time to get to the browser’s home screen when you explicitly launch the app (e.g. by pressing the Firefox icon in the app chooser), another where you load a web page in a browser from another app (e.g. by clicking on a link in the Twitter application).
The first is actually fairly easy to test across browsers, although we are not currently. There’s not really a good reason for that, it was just an oversight, so I filed bug 852744 to add something like this.
The second case (startup to the browser’s homescreen) is a bit more difficult. The problem here is that, in a nutshell, an apples to apples comparison is very difficult if not impossible simply because different browsers do different things when the user presses the application icon. Here’s what we see with Firefox:

And here’s what we see with Chrome:

And here’s what we see with the stock browser:

As you can see Chrome and the stock browser are totally different: they try to “restore” the browser back to its state from the last time (in Chrome’s case, I was last visiting taskjs.org, in Stock’s case, I was just on the homepage).
Personally I prefer Firefox’s behaviour (generally I want to browse somewhere new when I press the icon on my phone), but that’s really beside the point. It’s possible to hack around what chrome is doing by restoring the profile between sessions to some sort of clean “new tab” state, but at that point you’re not really reproducing a realistic user scenario. Sure, we can draw a comparison, but how valid is it really? It seems to me that the comparison is mostly only useful in a very broad “how quickly does the user see something useful” sense.
Panning tests
I had quite a bit of hope for these initially. They seemed like a place where Eideticker could do something that conventional benchmarking suites couldn’t, as things like panning a web page are not presently possible to do in JavaScript. The main measure I tried to compare against was something called “checkerboarding”, which essentially represents the amount of time that the user waits for the page to redraw when panning around.
At the time that I wrote these tests, most browsers displayed regions that were not yet drawn while panning using the page background. We figured that it would thus be possible to detect regions of the page which were not yet drawn by looking for the background color while initiating a panning action. I thus hacked up existing web pages to have a magenta background, then wrote some image analysis code to detect regions that were that color (under the assumption that magenta is only rarely seen in webpages). It worked pretty well.
The world’s moved on a bit since I wrote that: modern browsers like Chrome and Firefox use something like progressive drawing to display a lower resolution “tile” where possible in this case, so the user at least sees something resembling the actual page while panning on a slower device. To see what I mean, try visiting a slow-to-render site like taskjs.org and try panning down quickly. You should see something like this (click to expand):

Unfortunately, while this is certainly a better user experience, it is not so easy to detect and measure. For Firefox, we’ve disabled this behaviour so that we see the old checkerboard pattern. This is useful for our internal measurements (we can see both if our drawing code as well as our heuristics about when to draw are getting better or worse over time) but it only works for us.
If anyone has any suggestions on what to do here, let me know as I’m a bit stuck. There are other metrics we could still compare against (i.e. how smooth is the panning animation aka frames per second?) but these aren’t nearly as interesting.
Just wanted to give a quick heads up that as part of the ateam’s ongoing effort to improve the documentation of our automated testing infrastructure, we now have online documentation for mozdevice, the python library we use for interacting with Android- and FirefoxOS-based devices in automated testing.
Mozdevice is used in pretty much every one of our testing frameworks that has mobile support, including mochitest, reftest, talos, autophone, and eideticker. Additionally, mozdevice is used by release engineering to clean up, monitor, and otherwise manage
our hundred-odd the 1200*** tegra and panda development boards that we use in tbpl. See sut_tools (old, buildbot-based, what we currently use) and mozpool (the new and shiny future).
- Thanks to Dustin Mitchell for the correction.
I promised a few people I’d blog about this, so here you go.
To help with the business of making Android or FirefoxOS devices do our bidding, Mozilla Automation & Tools developed a Python library called mozdevice which allows you to control these devices either using the Android Debug Bridge protocol (which is actually not Android specific: FirefoxOS devices use it too) or the System Under Test protocol (a Mozilla-specific thing).
Anyone familiar with debugging these devices is doubtless familiar with adb, which provides a command line interface that allows you to push/pull files, run a shell, etc. To help test our python code (as well as expand the scope of what’s possible on the command line), I created a similar utility a few months ago called “dm” which provides a command-line interface to the aforementioned mozdevice code. It’s shipped as part of mozdevice, and testing it out is pretty simple if you have virtualenv installed:
virtualenv mozdevice
cd mozdevice
./bin/pip install mozdevice
source bin/activate
dm --help
I generally use this utility for two things:
- Testing out mozdevice code. For example, today we discovered an (unfortunate) bug in devicemanagerADB’s killProcess routine. It was easy to verify both the problem and my fix did what I expected by starting my custom build of fennec and running this command:
dm —package-name org.mozilla.fennec_wlach killapp org.mozilla.fennec_wlach
(yes, it's a bit unfortunate that this bug occurred in the first place: devicemanagerADB really needs unit tests)

  2. Day-to-day menial tasks, like getting device info/status, capturing screenshots, etc. You can get a full list of what this utility is capable of by running :help. E.g.:

    ```
(mozbase)wlach@eideticker:~/src/eideticker$ dm --help
Usage: dm [options] <command> [<args>]

device commands:
  info [os|id|uptime|systime|screen|memory|processes] - get
      information on a specified aspect of the device (if no argument
      given, print all available information)
  install <file> - push this package file to the device and install it
  killapp <process name> - kills any processes with a particular name
      on device
  launchapp <appname> <activity name> <intent> <URL> - launches
      application on device
  ls <remote> - list files on device
  ps  - get information on running processes on device
  pull <local> [remote] - copy file/dir from device
  push <local> <remote> - copy file/dir to device
  rm <remote> - remove file from device
  rmdir <remote> - recursively remove directory from device
  screencap <png file> - capture screenshot of device in action
  shell <command> - run shell command on device

Options:
  -h, --help            show this help message and exit
  -v, --verbose         Verbose output from DeviceManager
  --host=HOST           Device hostname (only if using TCP/IP)
  -p PORT, --port=PORT  Custom device port (if using SUTAgent or adb-over-tcp)
  -m DMTYPE, --dmtype=DMTYPE
                        DeviceManager type (adb or sut, defaults to adb)
  -d HWID, --hwid=HWID  HWID
  --package-name=PACKAGENAME
                        Packagename (if using DeviceManagerADB)
Before you ask, yes, it's technically possible to do much of this with the original adb utility. But (1) some of our internal stuff can't use adb a variety of reasons and (2) some of the tasks above (e.g. launching an app, getting a screenshot) involve considerably more typing with adb than with dm. So it's still a win. </li> </ol>

Happy command-lining!
Inspired by the work I’d been doing with Benoit Girard to integrate the Firefox Profiler with Eideticker, I decided to create an easy-to-use python script to help with gathering profiles on Fennec, which I call frof.
Frof pretty considerably reduces the amount of busywork you need to do to gather a profile. Instead of a rather complicated multi-step process to initialize fennec with the right parameters for profiling, downloading profiles, etc., you can just run the frof script like so:
<br /> frof org.mozilla.fennec http://wrla.ch mywonderfulprofile.zip<br />
Assuming that frof was bootstrapped correctly (and your phone is connected to your computer in debugging mode), this should start up fennec automatically with that URL loaded. Now, just perform whatever action you want to profile on your phone, then press enter in the terminal when you’re done. Voila, instant profile trace which you can examine, post to bugs, etc. All the other details are automated.
Backstory: the inspiration for frof came from a personal itch of mine, the fact that leaflet.js maps seem to be causing out-of-memory errors on Fennec when zooming is enabled (bug 784580). I wanted to be able to capture some profiles to see what was going on, but the current instructions on MDN seem a bit unwieldly. I figured I’d get lots of mileage out of a tool to make this easier (especially if I was going to get into a profile, edit, debug cycle), so I spent a few hours dilligently copying the logic we put into eideticker to gather profiles into a standalone script.

Unfortunately in my case, the gecko profile didn’t tell me much, aside from the fact that Gecko didn’t seem to be the culprit (remember that on Android we also have lots of Java-based frontend code to contend with, which the profiler doesn’t measure). I’m going to stare more at the Java code and dig into the various high-level tools that Android provides for profiling performance and memory usage. My current hypothesis is that the problem is the screenshot code and the CSS transitions that leaflet generates when zooming. In the mean time, the only thing I have to show for my foray away from writing tools for Mozilla is yet another tool.
Oh well, it could be worse. My fervent hope is that frof will be helpful for both Fennec developers and QA. Let me know if you wind up using it!
Ok, this is somewhat mundane, but I’ve already had to do it twice (and helped someone do something similar on #mobile), so I figured I might as well blog about it for posterity.
For various automation tasks (notably the Eideticker dashboard and the cross-browser startup tests), we need to be able to launch an Android browser on the command line (via adb shell or our own custom SUTAgent). This is a bit of a black art, but you can find references on how to do this on stackoverflow and other places. The magic incantation is:
am start -a android.intent.action.VIEW -n <application/intent> -d <url>
So, for example, to launch Fennec, you’d run this on the Android command prompt:
am start -a android.intent.action.VIEW -n org.mozilla.fennec/.App -d http://mygreatsite.info
Ok, easy enough, but what if we want to launch a new browser that we just downloaded (e.g. Google Chrome)? Where do we get the application and intent names?
The short answer is that you need to reach into the apk and dig. 😉 There’s probably many ways of doing this, but here’s what I do (which has the distinct advantage of not needing to compile, download or run weird java applications):
-
Copy the apk onto your machine (the apk should be in /data/app: if you have a rooted phone, you should be able to copy that off to your machine).
-
Extract AndroidManifest.xml from the apk (it’s just a .zip) and run axml2xml.pl on it.
-
Examine the resultant xml file and look for the tag. It should have a property called which is the package name. For example:
We can see pretty clearly that the application name in this case is com.android.chrome (you can also get this by running ps when using the application)
- Finally, look for a tag called with an tag with as the android-name property. Scan up for the overarching activity tag, whose android-name property. This is the activity name. For example:
Likewise here we see that the activity name we want is .Main (which Android explicitly expands out to com.android.chrome.Main)
Armed with this information, you should now have enough information to launch the application. Furthering the example above, here’s how to start Chrome on Android via adb’s shell:
am start -a android.intent.action.VIEW -n com.android.chrome/.Main -d http://mygreatsite.info
Hope this helps someone, somewhere.
Just thought I’d mention this because I found it handy.
A while back AaronMT wrote up some clever instructions on taking Android screenshots by dumping the contents of ‘/dev/fb0’ and running ffmpeg on the results. This is useful, but you need to know the resolution of the device you have connected to pass the right arguments to ffmpeg. Wouldn’t it be better if you had just one script that would work for whatever device you had plugged in?
In fact, there is a way to do this using the monkeyrunner utility. Intended mainly as a tool for synthesizing input on Android (more on that some other time), you can also easily get a capture of the Android screen with its python/jython API (assuming you have the Android SDK installed). Here’s a quick script which does the job:
from com.android.monkeyrunner import MonkeyRunner, MonkeyDevice
import os
import sys

if len(sys.argv) != 2:
    print "Usage: %s <filename>" % os.path.basename(sys.argv[0])
    sys.exit(1)

device = MonkeyRunner.waitForConnection()
result = device.takeSnapshot()
result.writeToFile(sys.argv[1], 'png')
Copy that into a file called capture.py (or whatever), then run it like so:
<br /> monkeyrunner capture.py screenshot.png<br />
And you’re off to the races! Nice screenshot, no utilities or non-essential command line arguments required!
(credit to this stackoverflow answer for the idea)
For the last few days I’ve been experimenting with getting a Pandaboard running Android 4.0, continuing the work that Clint Talbert started in the fall to get these boards for use as a replacement for the Tegra in Mozilla’s android automation. The first objective is to get a reproducible build going, after that we’ll try to get some of our custom tools (SUTAgent & friends) installed by default.
So far this has been interesting. Much as Clint did before, I thought I’d document some of the notes on what I did in the hopes that they’ll be helpful to other people trying to do similar things.
Getting things up and running is a two step process. First, you build the beast. This part is straightforward, just follow the instructions here:
At least the build part is more or less straightforward. Just follow the instructions here:
Note that you almost certainly want to build in the “eng” configuration, which is rooted and (apparently) has some extra tools installed.
Installing it is a little more tricky. The way they want you to do this is put the pandaboard into a special mode and copy the stuff you built onto an sdcard. Seem a little funny to you? Yeah, it does to me too. Why not just build an sdcard image directly?
Nonetheless, this is the officially supported way of imaging a pandaboard, so let’s just follow it until we can think of a better way of doing things. The instructions for doing this on the pandaboard are located in the source tree here:
<a href="http://source-android.frandroid.com/device/ti/panda/README">device/ti/panda/README</a>
These are mostly correct as far as I can tell, but there’s a few gotchas. First, you need to run the commands mentioned as root unless you’ve configured USB to be configurable by your user. Second, most of those commands are not in the path by default so you’ll need to specify the full path to e.g. the fastboot utility. The instructions here cover these exception cases: I recommend following them instead.
One thing which neither document mentions is that you really need to make sure your sdcard is wiped completely clean before using fastboot. The “oem format” step only recreates the partition table, it doesn’t delete any corrupted partitions. If you reboot while these are still in place, it will try to bring up your corrupted version of Android, not the fastboot console. I spent quite some time debugging why I couldn’t properly flash the operating system before realizing this. Easiest way to get around this is to dd /dev/zero onto the sdcard before beginning the flashing process.
Also, while not strictly necessary to get something up and running, I recommend highly getting an HDMI monitor as well as a serialUSB adapter. The former is useful to see if your Android device actually successfully booted up, the latter is useful for debugging boot issues where you don’t get that far (the serial console is always available from boot).
So, after painfully learning about the above caveats, I have managed to get things mostly working. I can see the ICS homescreen on my attached HDMI monitor and interact with it if I attach a USB mouse. The one gotcha is that both ethernet and WIFI networking are totally broken. Plugging in an ethernet cable or connecting to a WIFI network seems to result in the machine randomly rebooting, with the logs saying nothing useful. Both of these things are ostensibly supposed to be working according to the latest I’ve read from Google so I’m not exactly sure what’s going on. Investigations will continue.